Sunday 3 November 2013

Sloe on Vellum

It has been a long time since I last painted on vellum. Two weeks ago I found my vellum again and thought it would be fun to paint something  on the calfskin. I rescued last Monday a branch of the Blackthorn in front of our house. Just before the big storm arrived. I love Sloe, the twigs with the thorns, the white flowers in spring and of course the berries in autumn.


It always takes a while to get used to painting on vellum again. It's so different from painting on paper because the paint sits on the surface and doesn't get absorbed. The result is more brilliant and warm. It's more alive. Maybe more on vellum soon...

Monday 28 October 2013

I Conquered the Conkers


Or "Bonkers for Conkers" could have been great title too I guess. Here it is, at last... the composition I made with the Horse Chestnuts and some twigs and dried leaves from the tree. It's all in coloured pencil and a lot of fun to do. I'm very happy though that I now can do something else again... This weekend I found my vellum. So maybe.....

Sunday 6 October 2013

More Chestnuts

Horse Chestnuts that is. They never bore and they are all so different. I just had to make a series of them. I might do one or two more but thought I'd share what I've done so far. All in coloured pencil.


Sunday 29 September 2013

Conker


So... not reaching the target of 30 this year. Last year it was my arm and now the cold spoiled it. Oh well, I'll just continue with a few, just for fun. Here's a conker in coloured pencil. There might be more of them since there are still many on the trees. And they are loads of fun to draw.

Friday 27 September 2013

Pomegranate


I will not get all 30 drawings done for the challenge. I got a cold and felt bad the last couple of days. I'll continue though for fun but 30 is no longer my target. It doesn't matter so much. I had fun the first weeks.

Last days I "painted" a pomegranate in coloured pencil. My Italian friend gave me two nice red ones and I had them still in a bowl waiting to be eaten. But before eating them I wanted to paint or draw them. So, with a runny nose and burning eyes I did just that. Time to eat it now and get better ;)


Sunday 22 September 2013

Learning by Teaching

Today I posted this on my wall:
Last week I had a new student here in my studio. It was great. Going back to the basics and telling her lots about graphite techniques and even more about form and shading. Explaining why you put shadows here and not there, why you should do this and not do that.... wow....
All these things I do so automatically and now I need to explain my every action and decision.
It's not easy when someone asks you so many elementary questions. A wise man told me that it's like teaching a foreigner about your own language without being too familiar with all the grammar rules.

Perhaps it was me being the student, not her...

I needed to let it all sink in I guess before I could come to this conclusion. If you can call this a conclusion. It doesn't matter what it is. It was a good thing and that's what matters.  

So talking about this session with my new student, I thought it would be nice if I could show her how you can use atmospheric perspective in a drawing to create a sense of depth. For making this example I had cut off a twig of a Snowberry shrub near our house. I personally don't like them but just like the Cherry Laurel, it looks fine in black and white ;)

I first made a line drawing (my number 12 drawing for the challenge). 


So I created that same twig (using the line drawing as a base) for the tonal study (the no.13), using a bit of atmospheric (aerial) perspective this time.

Sneeuwbes

The photos here didn't turn out so well. I need to try and make better ones. But you get the idea... hope my student does too ;)

Tuesday 17 September 2013

Cherry Laurel Update


I managed to finish the Cherry Laurel today. So here it is. No.10 and 11 of the 30 day challenge.

Monday 16 September 2013

Graphite Warm-Up

On Wednesday I'll be welcoming a new student in my studio. I haven't met her yet but she sent me some photos of her work. What I saw was very promising. We agreed to go back to basics and start with graphite pencils. She already made some pencil work but it looks a bit rough and unfinished. So we'll dive into the graphite techniques.
I haven't worked in graphite for quite some time. And if you have to start after a long break you feel rusty and a bit clumsy. Like a machine that needs to be oiled and warmed up before working well again. Well, that's how it is for me anyway. And I know this. So, to prevent myself from drawing like a beginner next Wednesday, I ordered myself to a warm-up. And since I'm also working on this 30 day challenge on Facebook, I thought to combine the two. So here they are...

First a leaf from some sort of crab-apple in our street. No idea what kind of Malus it is but I always like the leaves and how they curve. It's my first one and I did feel very rusty. I think it shows too and I made a few stupid mistakes (like working too fast and putting in the veins with an embossing tool) but the leaf itself and the lines worked nicely.


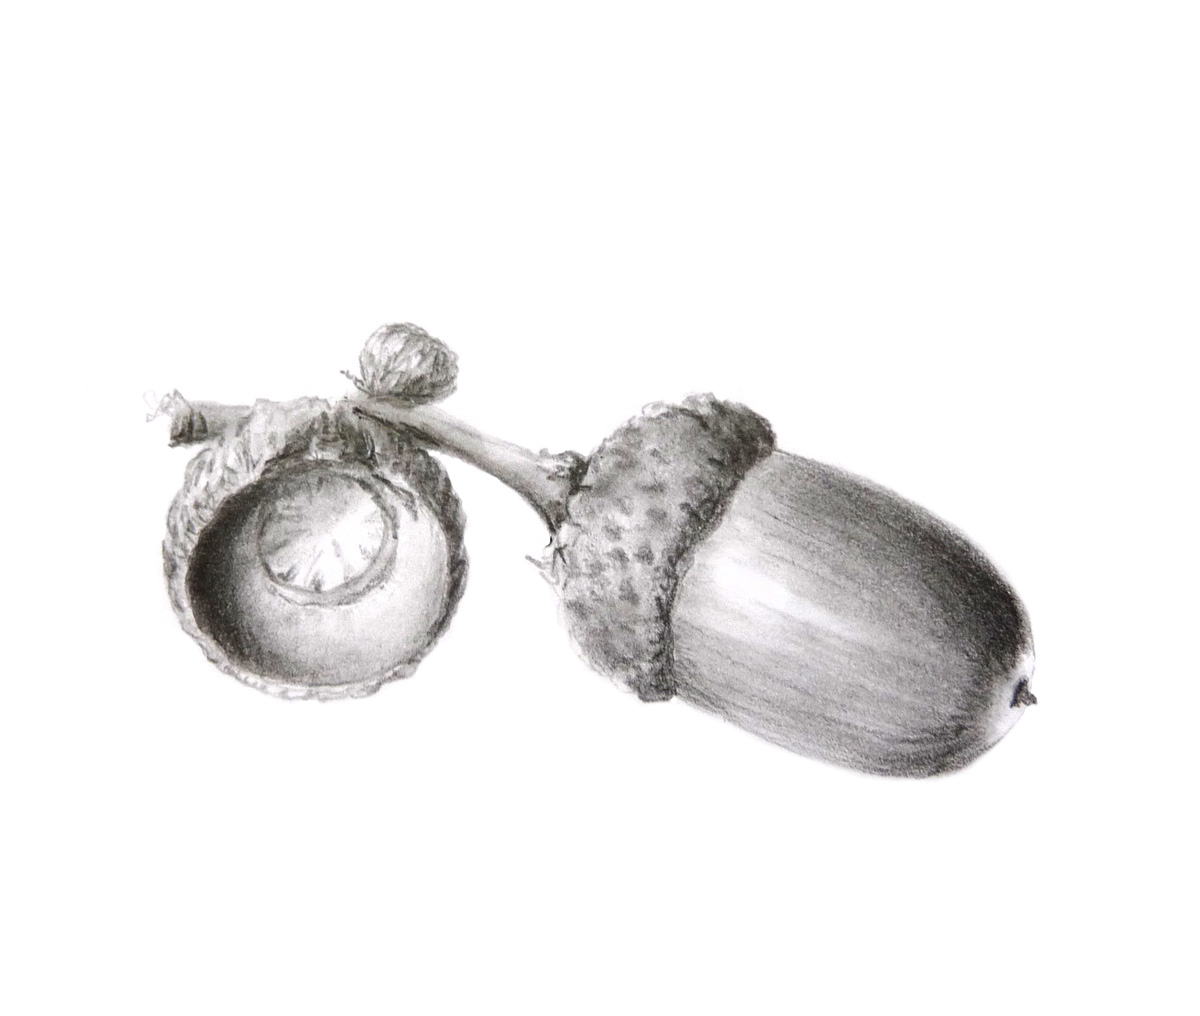
Like I said, I knew this would happen. It always does. So next I tried to work slower but it was a small drawing so it went rather quick anyway. A nice Acorn. I love to draw and paint acorns. No idea why but it's just one of my favourite subjects. It went rather well and although it could have been more detailed and smoother I was happy with it.


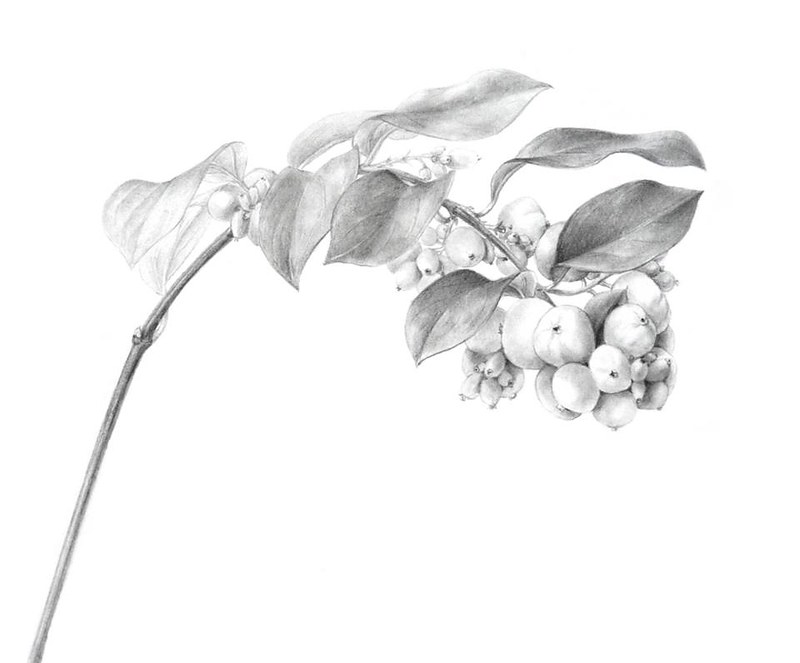
Today I started a project that will take at least two days. I think the 30 day challenge should be all 1 day pieces but I divided the drawing in two parts. Today I did the fruits, tomorrow I'll do the leaves. I cut a twig of a Cherry Laurel (Prunus laurocerasus). I really hate that shrub and never thought I would draw it but in graphite everything looks good. I guess it's like photography. If all else fails, do it in Black and White ;)


More later.


Wednesday 11 September 2013

More Treasures

I'm still busy painting my small finds for the 30 days challenge on Facebook. The results are here but the photos are not that good. Most of them taken with my iPhone. But it's just to share it and give you an idea. Also I would like to add that not all thingies are that well painted. I hate painting leaves and the one leaf I did of the Amelanchier lamarckii turned out a bit poorly. So let's start with that one:


The next one I painted was much better and also more fun. It's the seed pods of Iris sibirica. I paint them almost every year because they are never boring.

The one I painted after that was the most fun so far. The seed of a Lime tree or Linden, if you prefer that. Tilia x europaea seeds with a small leaf. It went surprisingly fast and turned out so nice. I'm really happy with this one.


Yesterday I painted a small sprig of flowers of Clematis vitalba. Again, this is a terrible photo but it's the best I could do with my iPhone. Perhaps later I'll try to take a better picture of it.


And today I painted a teeny-tiny Hydrangea flower of my Preziosa. Again, it's one of those subjects I paint every year because I never get tired of them. Actually I'm painting an entire sheet full of those flowers. Each year I take out that sheet and add a few more flowers.


There will be more to come....

Friday 6 September 2013

Me in Tresoar


Next Sunday will be the opening of a very special little exhibition in Tresoar, Leeuwarden, the Netherlands. Title of the exhibition is "Bloemenboek" (or "Blommeboek" in Frisian). It's all about the Florilegium painted by Franciscus de Geest in the 17th century in Leeuwarden. The book is all hand painted, never reproduced and very special. Normally it's being kept in Rome in the Biblioteca Nazionale Centrale but until the end of this year it is home again in Leeuwarden. Several months ago I was asked to participate in this event and I was so intrigued by the story behind the book and the time in which it was painted that I naturally offered my cooperation. Tresoar is the historical and literary centre of Friesland (a province in the North of the Netherlands). I had been there before with my mother to search for information about our ancestors (the archives are huge!).

This Spring the man behind this exhibition, Haye Bijlstra, came to my studio to make a short video of how I paint a botanical illustration. We went to Buitenpost where there is the Frisian Botanical Garden 'De Kruidhof'. For the film I chose to paint an apple blossom. Haye filmed me for four days while I painted. Of course it took at least 10 days more to finish it but it gives a nice idea of the process.
After the exhibition I'll post the film on my website but I can already show you the result of the painting. Of course the painting is in the exhibition too along with two other paintings done by yours truly. So, for now, here's the blossom of Malus domestica 'Reinette de Blenheim'.


Botanical Challenge

Every year in September our Botanical Artists Group on Facebook has a 30 days challenge. Normally I can't keep up with it and never end up with 30 paintings/drawings at the end of it. Dianne Sutherland organised this year's challenge. I'll try it too... again...


Because there were a lot of things going on here at my house this week, I already fell a bit behind. So for my first entry I painted not one but two things. A hip of Rosa moyesii 'Geranium' and Acorns from Bertus' harvest. Hopefully I can do two more tomorrow.


Monday 19 August 2013

Whitecurrants

This weekend I painted a little string of pearls.


Wednesday 14 August 2013

Blueberries

That's right... Blueberries... What you see here is my blueberry palette. Pretty eh? Too many colours though. In fact you can paint them with four colours. I just tried out several paints to pick the best combination. I can't remember exactly which ones I prefered in the end. I think it might have been French Ultramarine, Burnt Umber, Quinacridone Magenta and Mineral Violet or something like that. Perhaps I used some Hooker's Green for the shadows (mixed with the magenta it gives a really dark colour). As you can see I also added a little bit of white to mix nice pale colours with for the bloom. That is also something I tested. How to get the best bloom. I can't say it was with the white mixtures or with white from the paper. Both ways worked rather well. I know, this post is not very helpful.... Just wanted to show you the pretty palette and the tiny result of 5 delicious berries... Made just for fun....

Talking about fun... See what happens when you flip the photo of the palette:

It's watching you! ;)


Saturday 20 April 2013

Tulipa turkestanica

 
Tulipa turkestanica

It has been a long time since I last posted something. The only reason for that was that I just had nothing to post. I already wrote about the troubles I had with my arm in the previous post and it only got worse after that. The doctor concluded I had a golfer's elbow as well as a tennis elbow. No fun. I wasn't able to draw or paint for months. But now I finally got permission to paint again.

At the end of winter there's not much flowering but I found these lovely Tulipa turkestanica at the garden centre. I have them in my garden too but with this year's winter they were still in the ground. So I bought them again and could draw one.

I felt very rusty painting this after such a long time. But in the end it turned out ok. Just like the Sterappels I did last year, I did this in watercolour first and then enhanced it with coloured pencil. I really enjoy taking advantage of the best qualities of the different materials.